New InfluxDB 2.0 Nodes
February 07, 2021 - Written by Mike Blackstock
Last year I published a revised set of InfluxDB nodes node-red-contrib-influxdb for Node-RED with significant contributions by Alberto Armijo @aarmijo (thank you!). This new version supports both InfluxDb 1.x and 2.0 using both the older InfluxQL query syntax and Flux query syntax.
In this post, I’ll show you how to set up InfluxDb 2.0 locally using Docker and how to read and write data using the new nodes. These nodes can write data to InfluxDb in a number of ways, so we’ll provide some examples on how to write single values, multiple fields, tags, multiple points and include client side timestamps.
Prerequisites
We’ll install InfluxDb using Docker, so you’ll need to install Docker first. Installation instructions for Mac and Windows can be found here. Docker Engine can also be installed on your favourite linux distribution.
Installing and Configuring InfluxDb 2.0
Once Docker is installed, downloading and running InfluxDb for some quick testing is simple. Execute the following command to download and install the latest version as of this writing:
docker run --name influxdb -p 8086:8086 quay.io/influxdb/influxdb:v2.0.3
Once InfluxDb is up and running, you can then access a console on the InfluxDb server container using the following command in another console window:
docker exec -it influxdb /bin/bash
Using the CLI in the influxdb container, set up the server as follows:
influx setup
You will then be prompted to fill in the following:
- Primary username (e.g. ‘admin’)
- Password for this user
- Password confirmation
- Primary organization name (e.g. home)
- Primary bucket name (e.g. test)
- Your retention period in hours, or hit enter for infinite (e.g. 720 for a month)
This will be confirmed, and saved in your configuration.
Now, for the InfluxDb nodes to connect to the database, you’ll need a token. To get the current list of tokens use:
influx auth list
This will return the token and permissions for the admin user just created, for example (INFLUXDB_TOKEN will contain your token):
ID			Description	Token					User Name	User ID			Permissions
06faf76aee677000	admin's Token	INFLUXDB_TOKEN      	                admin		06faf76adc677000	[read:authorizations write:authorizations read:buckets write:buckets read:dashboards write:dashboards read:orgs write:orgs read:sources write:sources read:tasks write:tasks read:telegrafs write:telegrafs read:users write:users read:variables write:variables read:scrapers write:scrapers read:secrets write:secrets read:labels write:labels read:views write:views read:documents write:documents read:notificationRules write:notificationRules read:notificationEndpoints write:notificationEndpoints read:checks write:checks read:dbrp write:dbrp]
Record the token somewhere handy since it will be needed to configure the nodes to communicate with InfluxDB later.
Writing and Querying Data
Before booting up Node-RED to use the new nodes, let’s write a bit of data to the database and query for it to make sure its working.
On the command line lets write some data like this:
influx write \
  -b test \
  -o home \
  -p s \
  'myMeasurement,host=myHost testField="testData",value=12.45'
Then we can query the data to ensure it was written as follows:
influx query 'from(bucket: "test") |> range(start: -1h) |> filter (fn: (r) => r._measurement=="myMeasurement")'
You should see output similar to the following (timestamps will be different).
Result: _result
Table: keys: [_start, _stop, _field, _measurement, host]
                   _start:time                      _stop:time           _field:string     _measurement:string             host:string                      _time:time           _value:string
------------------------------  ------------------------------  ----------------------  ----------------------  ----------------------  ------------------------------  ----------------------
2021-01-26T00:01:52.699347300Z  2021-01-26T01:01:52.699347300Z               testField           myMeasurement                  myHost  2021-01-26T00:51:36.000000000Z                testData
Table: keys: [_start, _stop, _field, _measurement, host]
                   _start:time                      _stop:time           _field:string     _measurement:string             host:string                      _time:time                  _value:float
------------------------------  ------------------------------  ----------------------  ----------------------  ----------------------  ------------------------------  ----------------------------
2021-01-26T00:01:52.699347300Z  2021-01-26T01:01:52.699347300Z                   value           myMeasurement                  myHost  2021-01-26T00:51:36.000000000Z                         12.45
More information on how to use Flux to query data can be found in the documentation.
Now that we’re sure we can write and query data from InfluxDb, we can set up Node-RED.
Installing Node-RED Locally
If you’ve already installed Node-RED you can skip to the next section to get started with the nodes.
Node-RED is a Node.js application. Before you can install it, you need to first install a supported version of Node.js. We recommend versions 12.x or 14.x LTS.
Once Node.js is installed, install Node-RED as follows:
sudo npm install -g --unsafe-perm node-red
Note: do not use
sudofor Windows)
Once Node-RED is installed you can run it from the command line:
node-red
And you should get console output similar to this:
Welcome to Node-RED
===================

25 Jan 17:08:32 - [info] Node-RED version: v1.2.6
25 Jan 17:08:32 - [info] Node.js  version: v14.15.1
25 Jan 17:08:32 - [info] Darwin 20.2.0 x64 LE
25 Jan 17:08:33 - [info] Loading palette nodes
25 Jan 17:08:34 - [info] Settings file  : /Users/mike/.node-red/settings.js
25 Jan 17:08:34 - [info] Context store  : 'default' [module=memory]
25 Jan 17:08:34 - [info] User directory : /Users/mike/.node-red
25 Jan 17:08:34 - [warn] Projects disabled : editorTheme.projects.enabled=false
25 Jan 17:08:34 - [info] Flows file     : /Users/mike/.node-red/flows_Michaels-MacBook-Pro.local.json
25 Jan 17:08:34 - [info] Server now running at http://127.0.0.1:1880/
Next lets install the Influxdb nodes.
Installing InfluxDb Nodes
The easiest way to install the InfluxDb nodes is using the Palette Manager.
In the top right of your Node-RED editor, click on the hamburger button, then click on Manage Palette. Click on the Install tab and then look for the influxdb node as shown.
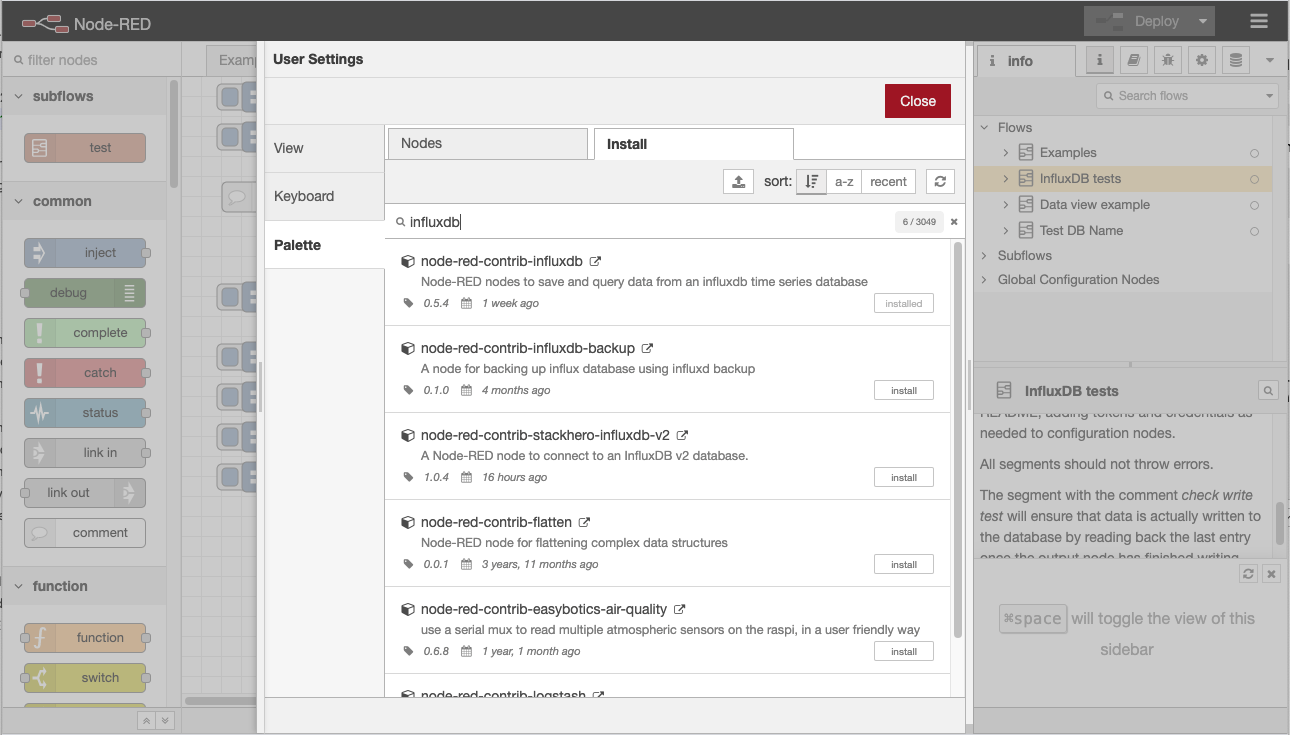
Click on the Install button and wait for the nodes to be installed.
Writing Data
Now lets draw a simple flow to write data to the database as we did from the CLI. Here’s what the flow looks like:

And here’s the flow for you to import into Node-RED:
[{"id":"61b073ed.7a83cc","type":"inject","z":"29f1d2ae.6da5fe","name":"","props":[{"p":"payload","v":"","vt":"date"},{"p":"topic","v":"","vt":"string"}],"repeat":"","crontab":"","once":false,"onceDelay":"","topic":"","payload":"","payloadType":"date","x":180,"y":380,"wires":[["24a46a5a.5f4d66"]]},{"id":"24a46a5a.5f4d66","type":"function","z":"29f1d2ae.6da5fe","name":"Fields","func":"msg.payload = {\n intValue: '10i',\n numValue: 11.0,\n strValue: \"message\",\n randomValue: Math.random()*10\n}\nreturn msg;","outputs":1,"noerr":0,"initialize":"","finalize":"","x":330,"y":380,"wires":[["859f009.3e247"]]},{"id":"859f009.3e247","type":"influxdb out","z":"29f1d2ae.6da5fe","influxdb":"dce8d0e9.45717","name":"write fields 2.0","measurement":"myMeasurement","precision":"ms","retentionPolicy":"","database":"test","precisionV18FluxV20":"ms","retentionPolicyV18Flux":"","org":"home","bucket":"test","x":500,"y":380,"wires":[]},{"id":"dce8d0e9.45717","type":"influxdb","hostname":"127.0.0.1","port":"8086","protocol":"http","database":"database","name":"local InfluxDb","usetls":false,"tls":"","influxdbVersion":"2.0","url":"http://localhost:8086","rejectUnauthorized":false}]
To get this flow to work, you’ll need to copy the token that InfluxDb generated for you on set up, and paste it into the configuration node.
The flow will write four fields added in the function node code:
msg.payload = {
    intValue: '10i',
    numValue: 11.0,
    strValue: "message",
    randomValue: Math.random()*10
}
return msg;
Once the flow is imported, click on the Inject button on the flow to write this data to the same organization bucket and measurement.
Querying Data
Now, lets write another simple flow to query data using Flux.
Here’s the simple query flow segment.

The query is very simple, we just get the last value of each field:
from(bucket: "test")
    |> range(start: -1d, stop: now())
    |> filter(fn: (r) => r["_measurement"] == "myMeasurement")
    |> last()
Here’s the flow for you to import:
[{"id":"d4a31b99.8d5df8","type":"influxdb in","z":"29f1d2ae.6da5fe","influxdb":"dce8d0e9.45717","name":"Query last","query":"from(bucket: \"test\")\n |> range(start: -1d, stop: now())\n |> filter(fn: (r) => r[\"_measurement\"] == \"myMeasurement\")\n |> last()","rawOutput":false,"precision":"","retentionPolicy":"","org":"home","x":310,"y":520,"wires":[["161bc1ac.a7cf7e"]]},{"id":"161bc1ac.a7cf7e","type":"debug","z":"29f1d2ae.6da5fe","name":"","active":true,"tosidebar":true,"console":false,"tostatus":false,"complete":"false","x":490,"y":520,"wires":[]},{"id":"8cfdb910.0e4128","type":"inject","z":"29f1d2ae.6da5fe","name":"","props":[{"p":"payload","v":"","vt":"date"},{"p":"topic","v":"","vt":"string"}],"repeat":"","crontab":"","once":false,"onceDelay":"","topic":"","payload":"","payloadType":"date","x":120,"y":520,"wires":[["d4a31b99.8d5df8"]]},{"id":"dce8d0e9.45717","type":"influxdb","hostname":"127.0.0.1","port":"8086","protocol":"http","database":"database","name":"local InfluxDb","usetls":false,"tls":"","influxdbVersion":"2.0","url":"http://localhost:8086","rejectUnauthorized":false}]
Click on the Inject node to query the database, and you’ll see output like this in the debug pane output (copy value); the last value of each field.
[{"result":"_result","table":0,"_start":"2021-01-25T19:24:30.5437867Z","_stop":"2021-01-26T19:24:30.5437867Z","_time":"2021-01-26T03:22:13.609Z","_value":10,"_field":"intValue","_measurement":"myMeasurement"},{"result":"_result","table":1,"_start":"2021-01-25T19:24:30.5437867Z","_stop":"2021-01-26T19:24:30.5437867Z","_time":"2021-01-26T03:22:13.609Z","_value":11,"_field":"numValue","_measurement":"myMeasurement"},{"result":"_result","table":2,"_start":"2021-01-25T19:24:30.5437867Z","_stop":"2021-01-26T19:24:30.5437867Z","_time":"2021-01-26T03:22:13.609Z","_value":3.2079169788853013,"_field":"randomValue","_measurement":"myMeasurement"},{"result":"_result","table":3,"_start":"2021-01-25T19:24:30.5437867Z","_stop":"2021-01-26T19:24:30.5437867Z","_time":"2021-01-26T03:22:13.609Z","_value":"message","_field":"strValue","_measurement":"myMeasurement"},{"result":"_result","table":4,"_start":"2021-01-25T19:24:30.5437867Z","_stop":"2021-01-26T19:24:30.5437867Z","_time":"2021-01-26T00:51:36Z","_value":"testData","_field":"testField","_measurement":"myMeasurement","host":"myHost"},{"result":"_result","table":5,"_start":"2021-01-25T19:24:30.5437867Z","_stop":"2021-01-26T19:24:30.5437867Z","_time":"2021-01-26T00:51:36Z","_value":12.45,"_field":"value","_measurement":"myMeasurement","host":"myHost"}]
Output similar to the query output on the CLI.
Data formats
The InfluxDb output node supports a variety of data formats. There are 4 different shapes of the message payload supported. Here are some Javascript snippets to illustrate the different options:
Single value
If the msg.payload is set to a string, number, or boolean, it will be saved in a field called value in the InfluxDb measurement. For example:
msg.payload = '12i'; // integer in 1.8 and 2.0 configurations
msg.payload = 0.456;
msg.payload = 'string'
msg.paload = true;
Multiple Fields Object
When msg.payload is an object, each property will be written as a separate field. For example:
msg.payload = {
    intValue: '10i',
    numValue: 11.0,
    strValue: "message",
    randomValue: Math.random()*10
}
Tags and Fields
To write multiple fields along with tags, you use an array containing two objects. The first contains the fields, the second contains the tags. For example:
msg.payload = [{
    numValue: 12,
    randomValue: Math.random()*10,
    strValue: "message2"
},
{
    tag1:"sensor1",
    tag2:"device2"
}];
Multiple Points
Finally you can output multiple points. To do so, you supply a payload containing an array of arrays. For example:
msg.payload = [
    [{
        numValue: 10,
        randomValue: Math.random()*10,
        strValue: "message1",
        time: new Date("2021-01-20T00:00:00Z")
    },
    {
        tag1:"sensor1",
        tag2:"device2"
    }],
    [{
        numValue: 20,
        randomValue: Math.random()*10,
        strValue: "message2",
        time: new Date("2021-01-20T00:00:00Z")
    },
    {
        tag1:"sensor1",
        tag2:"device2"
    }]
];
Specifying (Client Side) Timestamp
Note in the last example we provide timestamps for the data using the reserved time property. The time property can also be set to a number in the precision units (s, ms, us, ns) specified in the output node (ms by default).
Troubleshooting
If you have any problems, the nodes will return an error that can help you determine what went wrong.
Common errors include connectivity errors related to getting the URL right in the configuration (e.g. http/https, port). In some cases the organization or bucket may be set wrong. Care should be taken to use double quotes when using names in queries that include special characters like hypens (-).
What’s next
These nodes have a lot of features including support for older Influx database versions and InfluxQL queries as described in the README.
Over time I expect to deprecate support for versions older than 1.8, InfluxQL, but I expect this will not be for some time.
I will also spend some more time improving the documentation and providing more meaningful examples.
Recently we added support for the complete node so that you can trigger flows when you are sure data has been written to, or queried from InfluxDb. This should help ensure data is not lost.
I am considering adding optional validation to ensure output data is formatted correctly given the various possible formats.
Let me if you have any questions or feedback in the comments here or raise an issue on Github. Of course, contributions are welcome including documentation (README), or translations.
Thanks again to everyone who has tested this node, reported issues, provided feedback, and/or contributed. I really appreciate it.